So what I'm going to show you today is how to create a fuller, longer ponytail. No extensions needed!
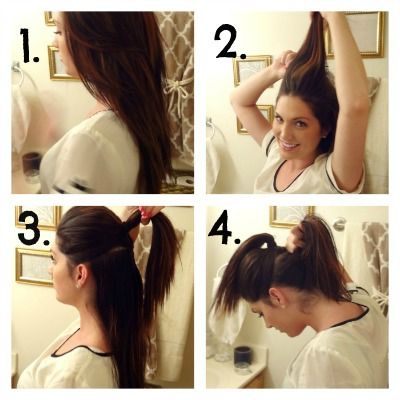
2.back comb at the roots of the crown for some volume.(hopefully you know how to tease your hair, I don't think I could explain that one very well)
3. divide your hair in half right above or slightly below your ears. The further down you separate the hair, the more natural this will look...if that make sense? Pull the hair back into a half pony and secure with elastic
4.gather the remaining hair into another ponytail, combing it upward, and trying to get it gathered as CLOSE to the ponytail you just made. Got it? good.

5. Secure that small pony with elastic as well and give it a nice firm tug, hopefully pulling it even closer to the top ponytail.
6.Pull the top pony and tighten it, pulling the hair on the sides over the ponytail underneath...hopefully you are still following me.
7. Go ahead and back comb the top ponytail if you like to give it some volume and make it look fuller.


whit. what? dis is real?
ReplyDeletewow! mind blowing definitely :)
xx
So, for fun reading - and since we know you'll try it once you're done - here's the full guide on how to make a bed.
ReplyDeleteCompletely.
Start fresh
When it comes to choosing leaves, sticking to a good neutral color is best.شركة تنظيف بالدمام
شركة تنظيف بالاحساء
شركة كشف تسربات المياه بالاحساء
شركة تنظيف منازل بالدمام
ReplyDeleteشركة تنظيف بالدمام
شركة تنظيف كنب بالدمام
شركة تنظيف موكيت بالدمام
شركة تنظيف بالاحساء
شركة مكافحة حشرات بالدمام
شركة مكافحة حشرات بالاحساء
شركة تنظيف بالدمام
شركة تنظيف بالدمام